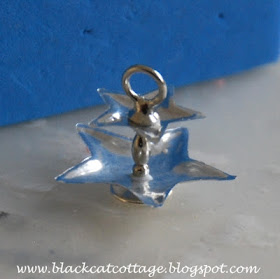
The technique of the previous post can also be used on tealight cups. This metal is thicker and stronger, not suitable for detailed features, but very suitable for... a etagère, for example. I have a etagère of Riverdale, with plates in the shape of stars. Left the etagère as sold by Riverdale, right my miniature version, 2,3 cm in height.
This is what I used. The blue thingie is a piece of soft plastic foam.
I punched a bigger and a smaller heart. I used the big embossing pen on one side of the metal, on the entire star except for the borders.
Then I turned the metal upside-down, and worked on the borders with a small embossing pen.
I repeated both treatments 2 times for the best effect. It makes the metal smooth and shiny. A hole is pinced in the middle, first with a needle to make the hole, and second with the earring-stud (if you understand what I mean, it is visible in the second picture) to make it fit.
Time to assemble, using a bit of glue to stabilize it. The top-ornament is also from jewelry-making, to make a hanger of a sphere.
Hope you like it!
Marit


A precious tutorial! Thank you very much for sharing!
BeantwoordenVerwijderenGracias por el tutorial, es hermoso!!
BeantwoordenVerwijderenSaludos!
Marit, je bent een genie!! Bedankt voor je leuke tutorial en zo duidelijk uitgelegd!!
BeantwoordenVerwijderenDe Kersttijd wordt voor mij te kort zo...
Groetjes, Ilona
Wow! A wonderful tutorial! I love the way your serving two-layers tray looks. Thank you for sharing.
BeantwoordenVerwijderenHugs, Drora
This is wonderful! :D
BeantwoordenVerwijderenMarit- I have been on vacation but one of the first things I have had to do since I've started to catch up is to come visit your blog and see your progress on the Christmas house. What great tips you are giving us- I love seeing how you create your minis so much! You are so generous to share- makes me itch to make some minis! The post with the mirror was brilliant- and this post is fantastic too- Your project is looking so wonderful!!!
BeantwoordenVerwijderenHi Marit! thanks to share the tutorials it is really very nice and so clever! I know I will never be able to do it... doei, claude
BeantwoordenVerwijderenOh!!! I love it!!! Thank you for the tutorial. Hugs
BeantwoordenVerwijderenAuxi
Great idea! Thanks for the fantsic turorial.
BeantwoordenVerwijderenGreetings
Melanie
Hello Marit! I think that was a very clever use of the Star punches! I would have Never have thought of using them on metal! This is a terrific tutorial and I am now wanting to try these myself! Thank you!
BeantwoordenVerwijderenelizabeth